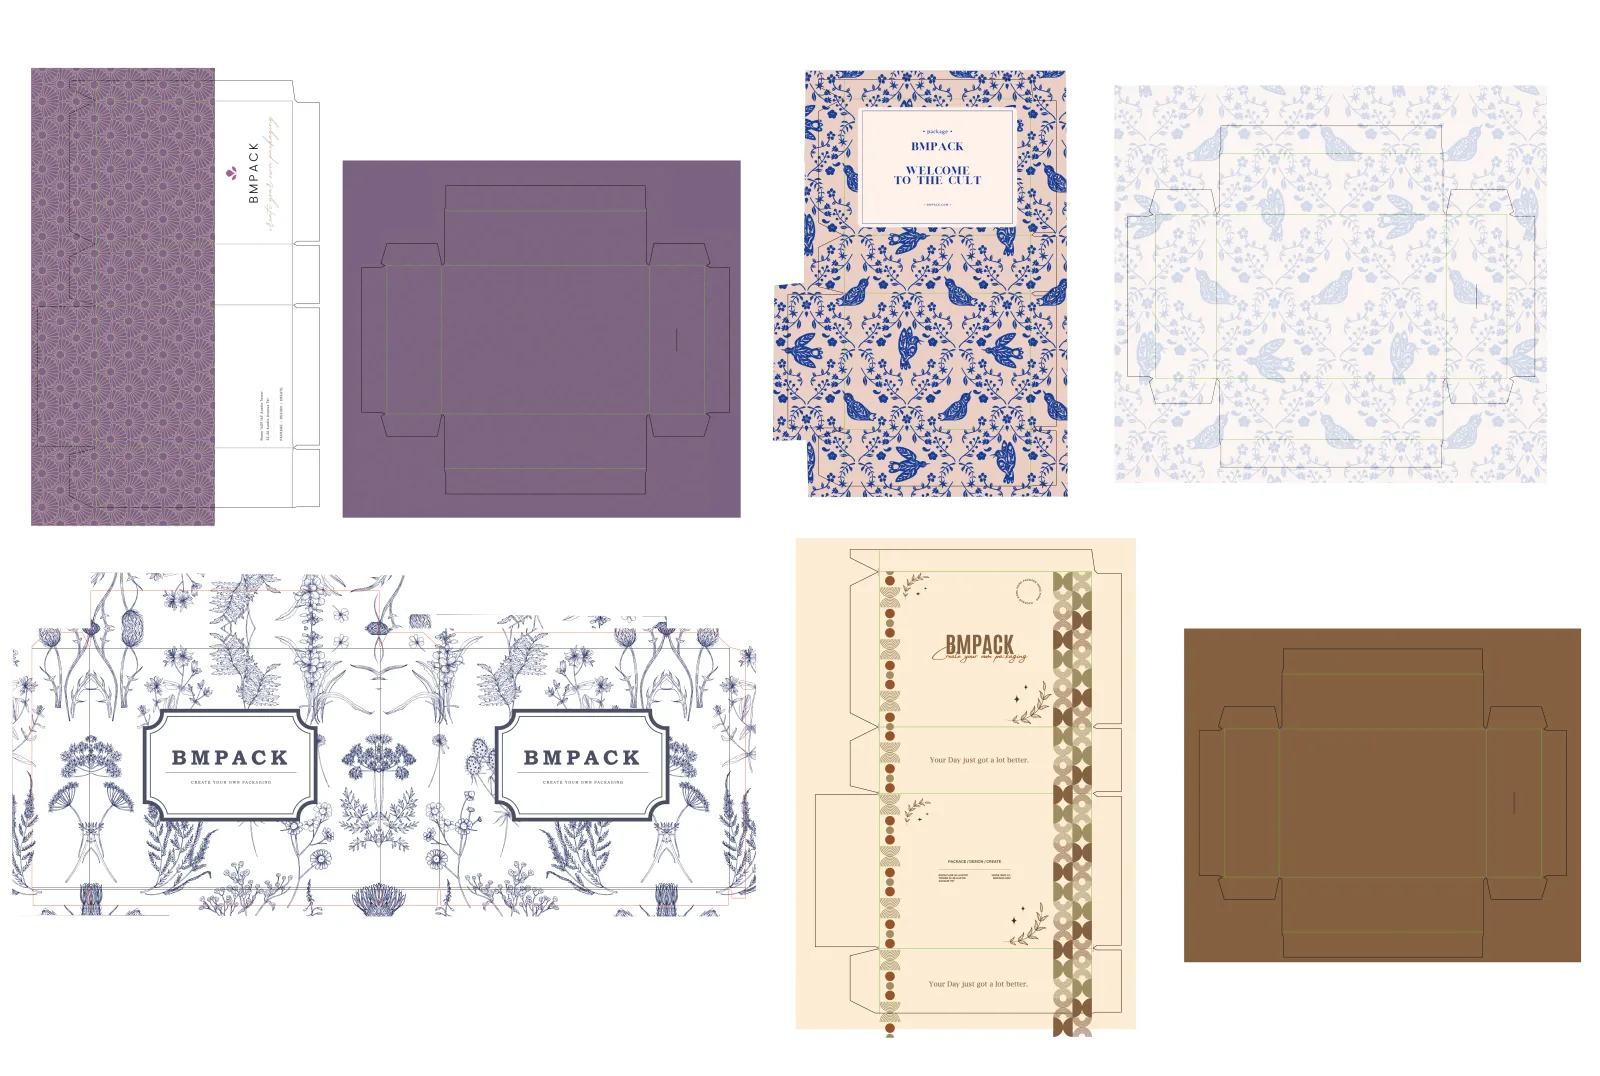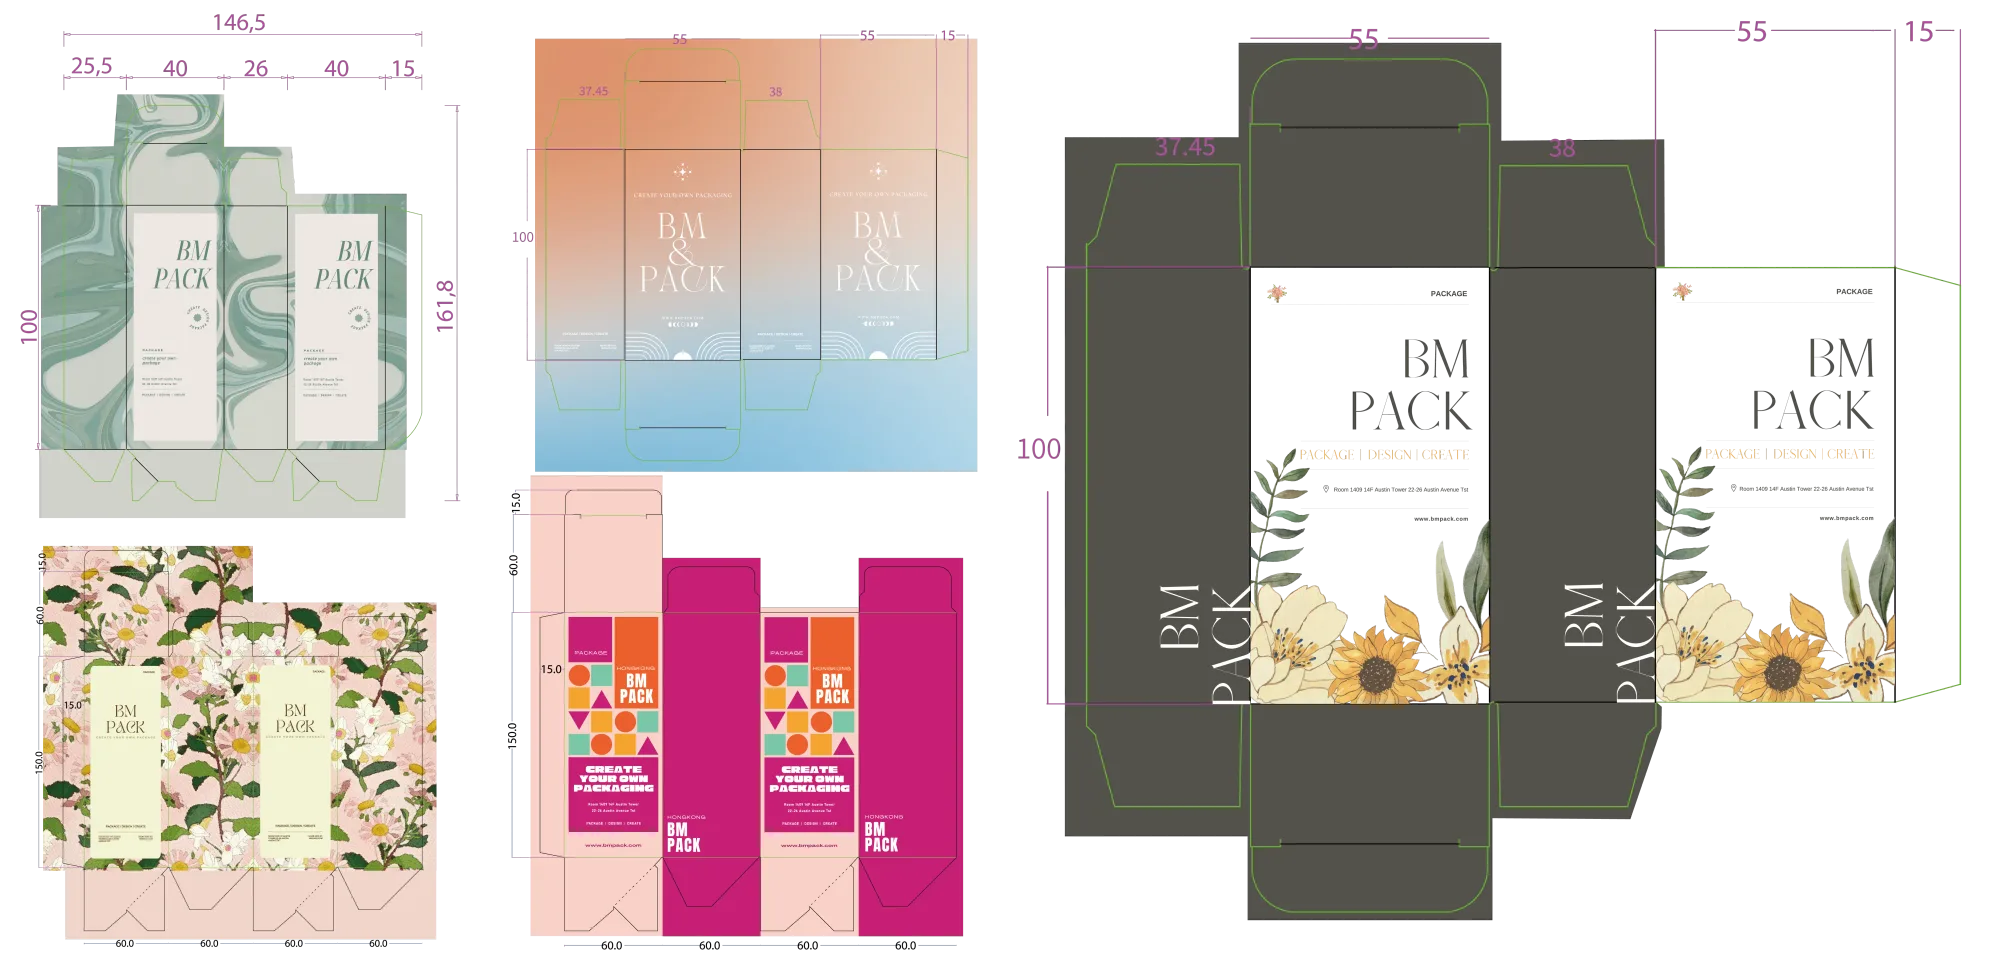
As a graphic designer you do not need to draw the die. You do need to know what every line on the drawing means, or the artwork ends up on the wrong panel or facing the wrong way.
If a structure is still unclear after reading, print the dieline small, cut it out and fold it. For complex boxes this five-minute step saves a reprint.
The four things on every dieline
- Cut line
- Black line. The blade cuts here; it becomes the outer edge. Artwork must bleed 3 mm past it.
- Fold line
- Green line. A crease, not a cut. Never run text or a logo across it.
- Glue flap 黏位
- Glued under another panel and never seen. Leave it unprinted or a flat colour.
- Tuck-in 反折位
- Folds inside the box. Only put artwork here if you want it seen when the box is opened.
Text direction: the panel labels are printed the way each panel will finally face. Follow the label, even when it reads upside down.
Mailer box (飛機盒) and flip-top folding carton
Seven printable panels: front, two sides, back, bottom, the inner opening flap and the front opening flap. The corrugated mailer and the cardstock flip-top carton share the same layout.
To print the inside as well, copy the dieline and rotate it 180 degrees so the inner artwork reads the right way up when the lid opens.
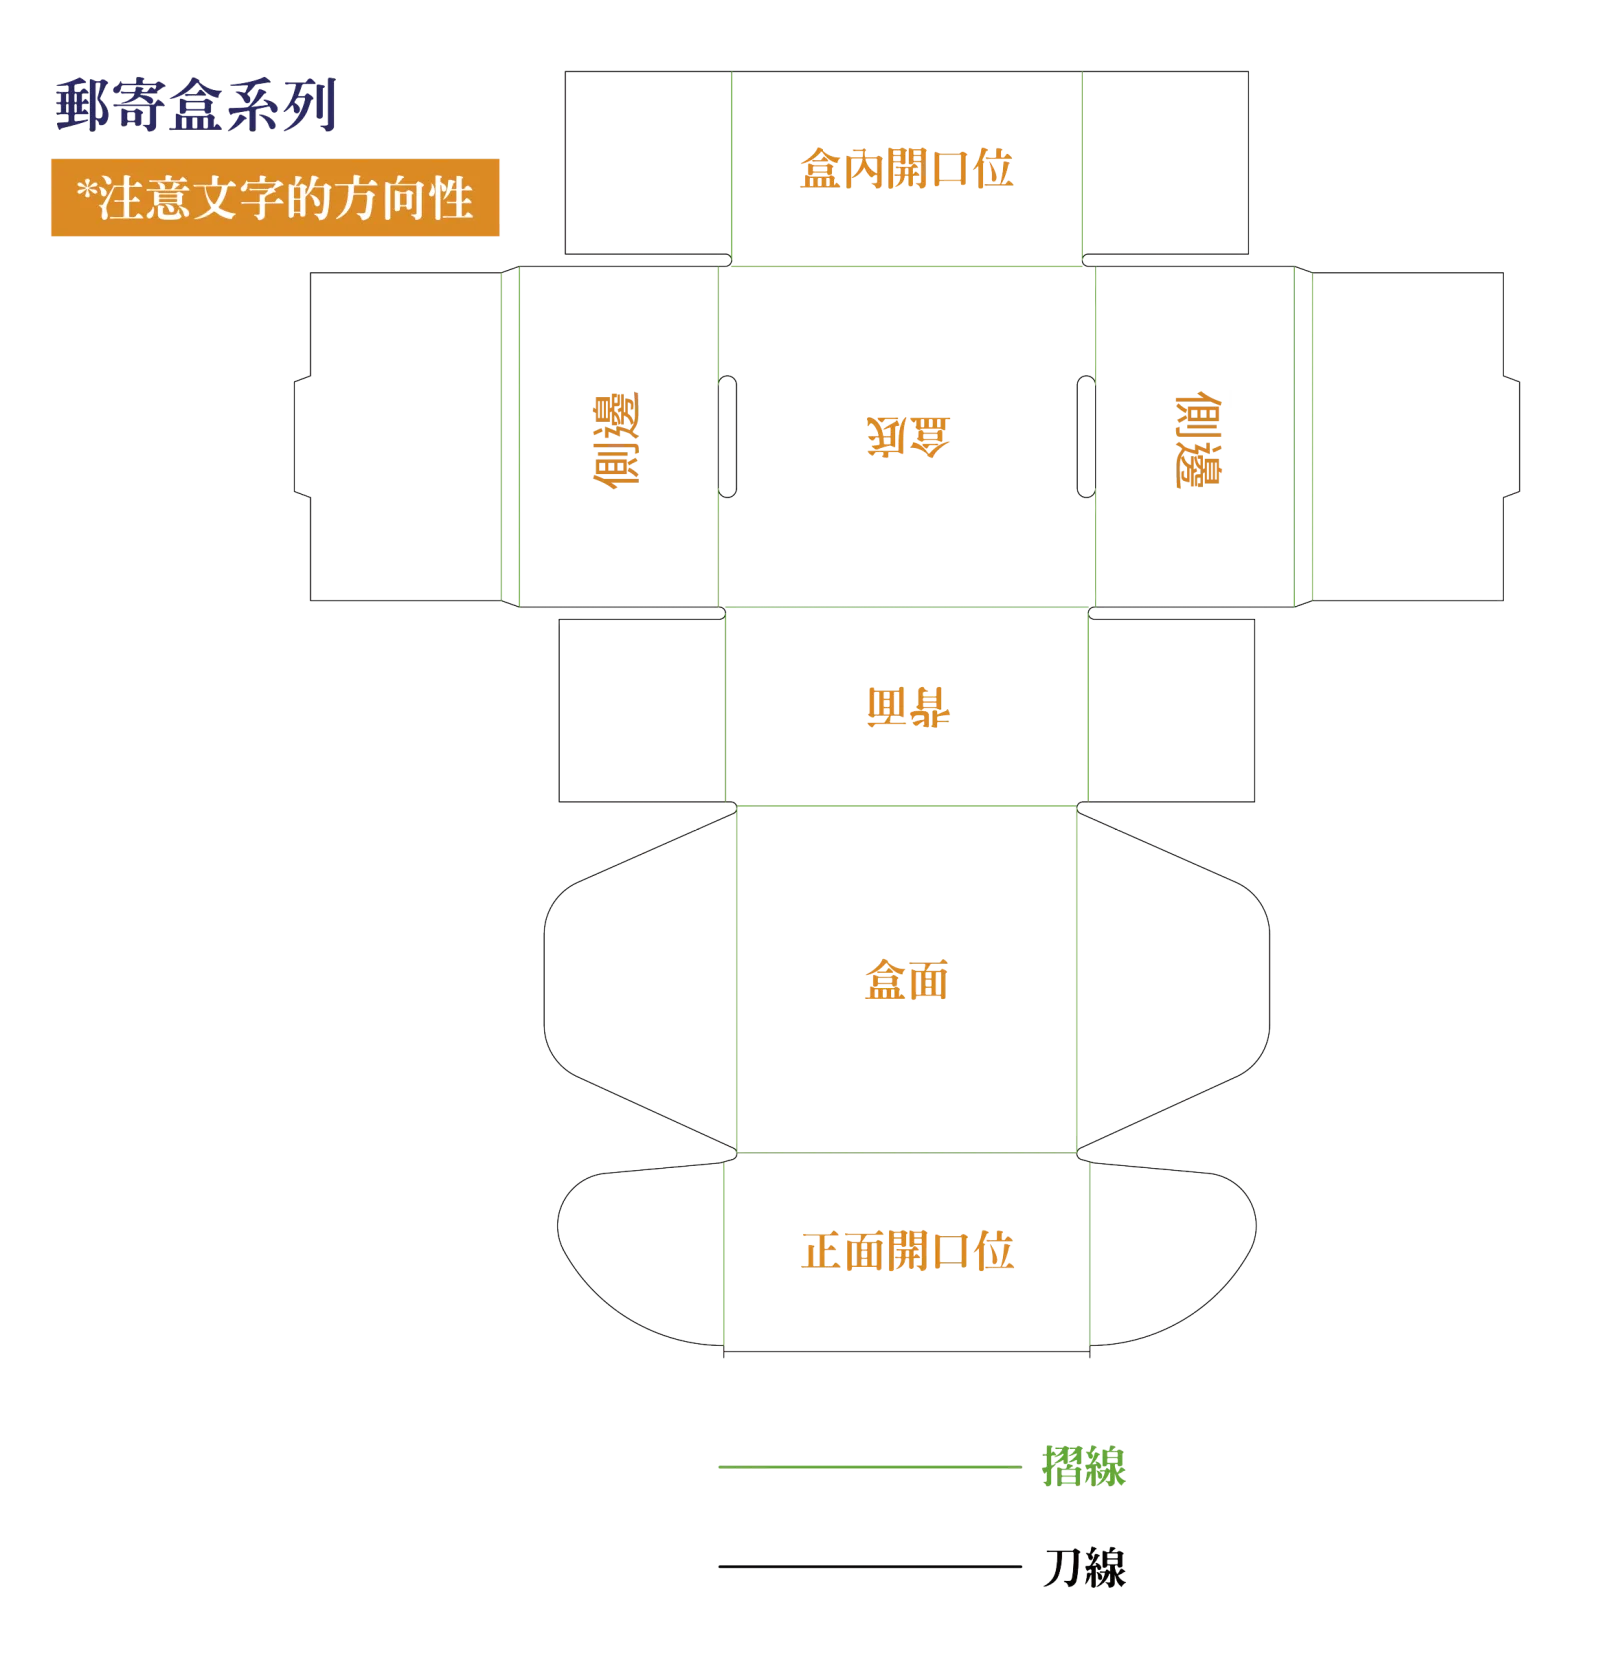
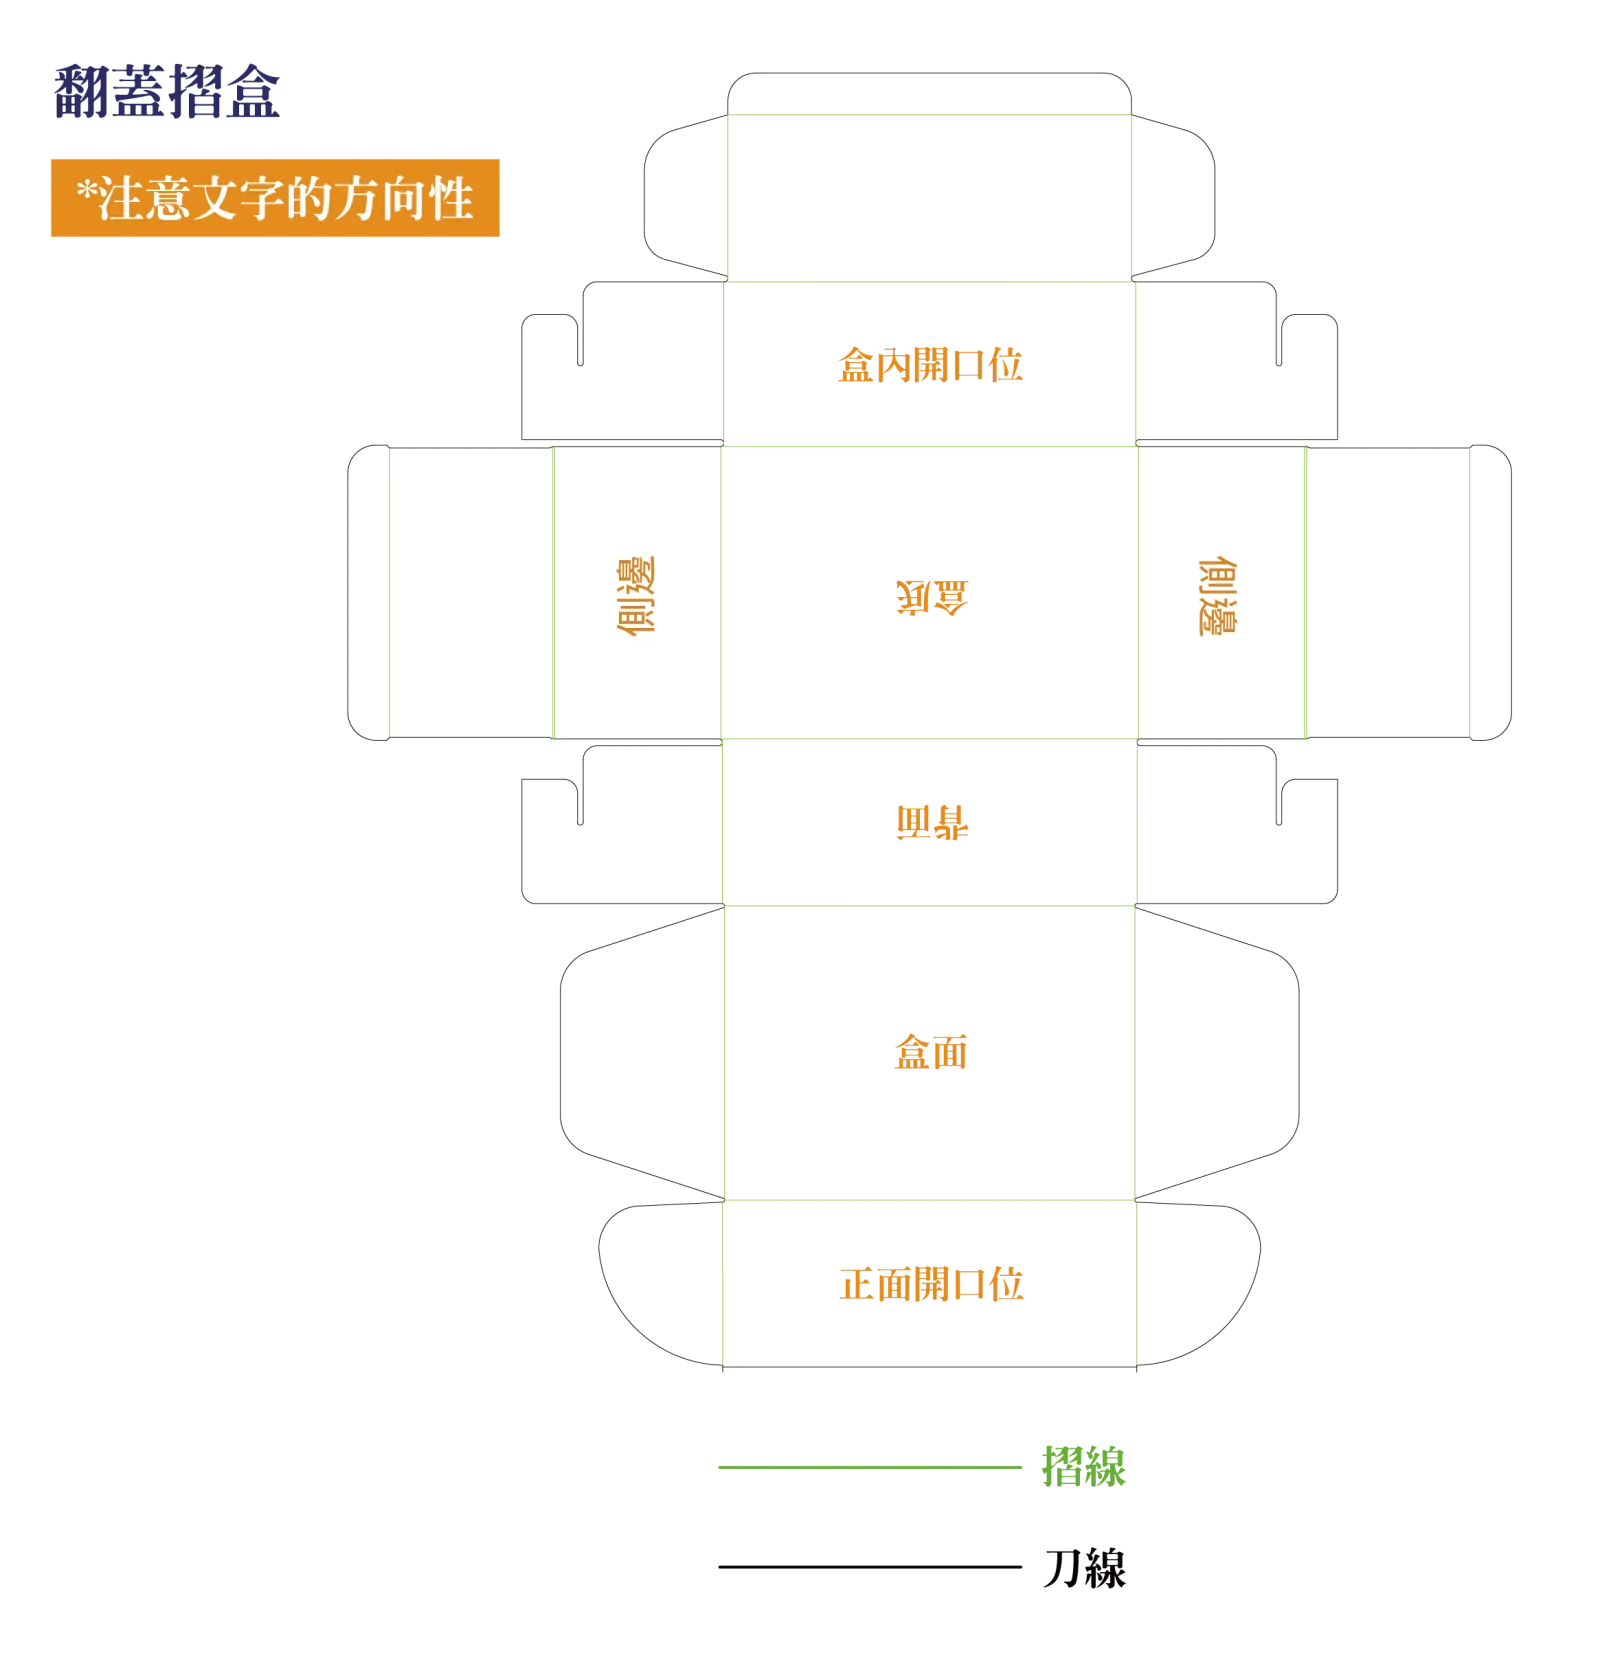
Tip:Side panels and the back are upside down on the sheet: design them that way.
Shipping carton (紙箱)
Eight panels: two fronts, two sides, the top flaps and the bottom flaps, plus a glue flap on the left. Cartons print in one colour, so build the artwork in pure black (C0 M0 Y0 K100).
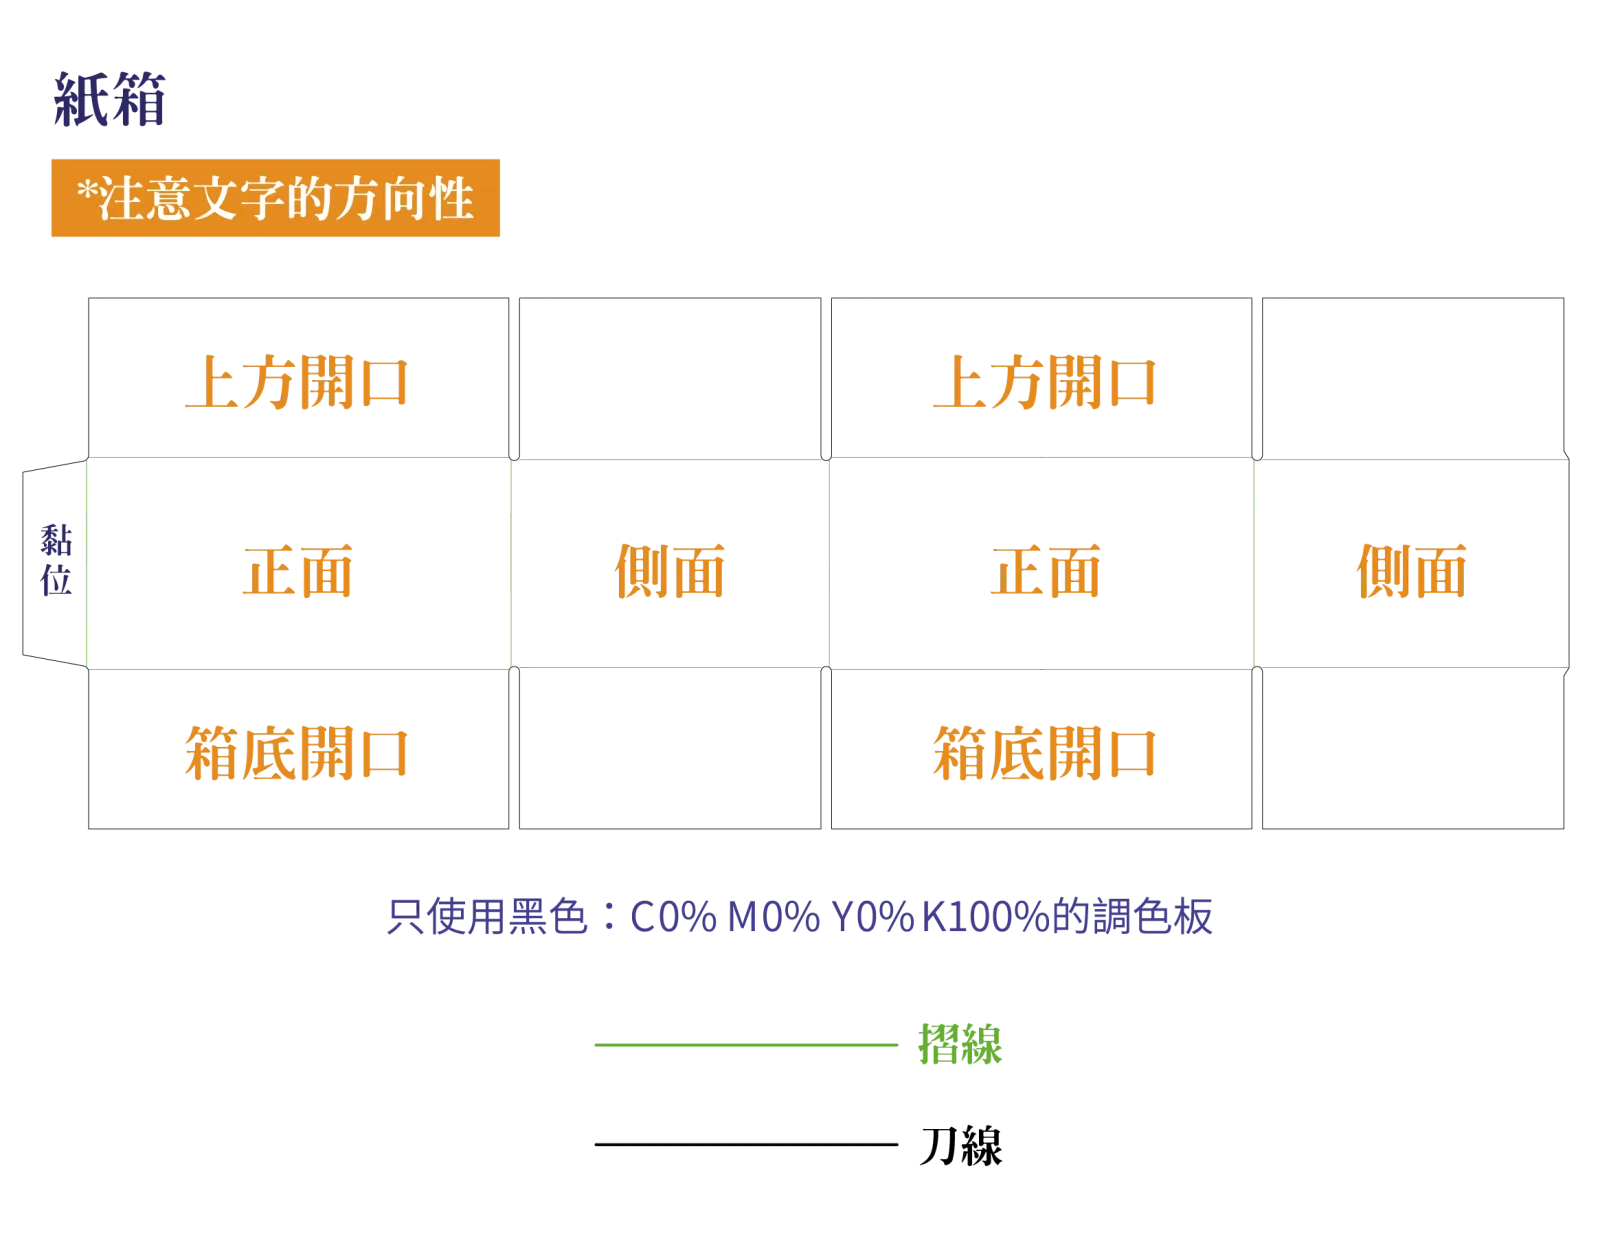
Tip:The top and bottom flaps overlap when closed; keep the logo on the front panels.
Sleeve (圍條)
Four panels in a strip: front, top, back and bottom, with a glue flap at one end. The side of the sleeve is the board edge, so nothing prints there.
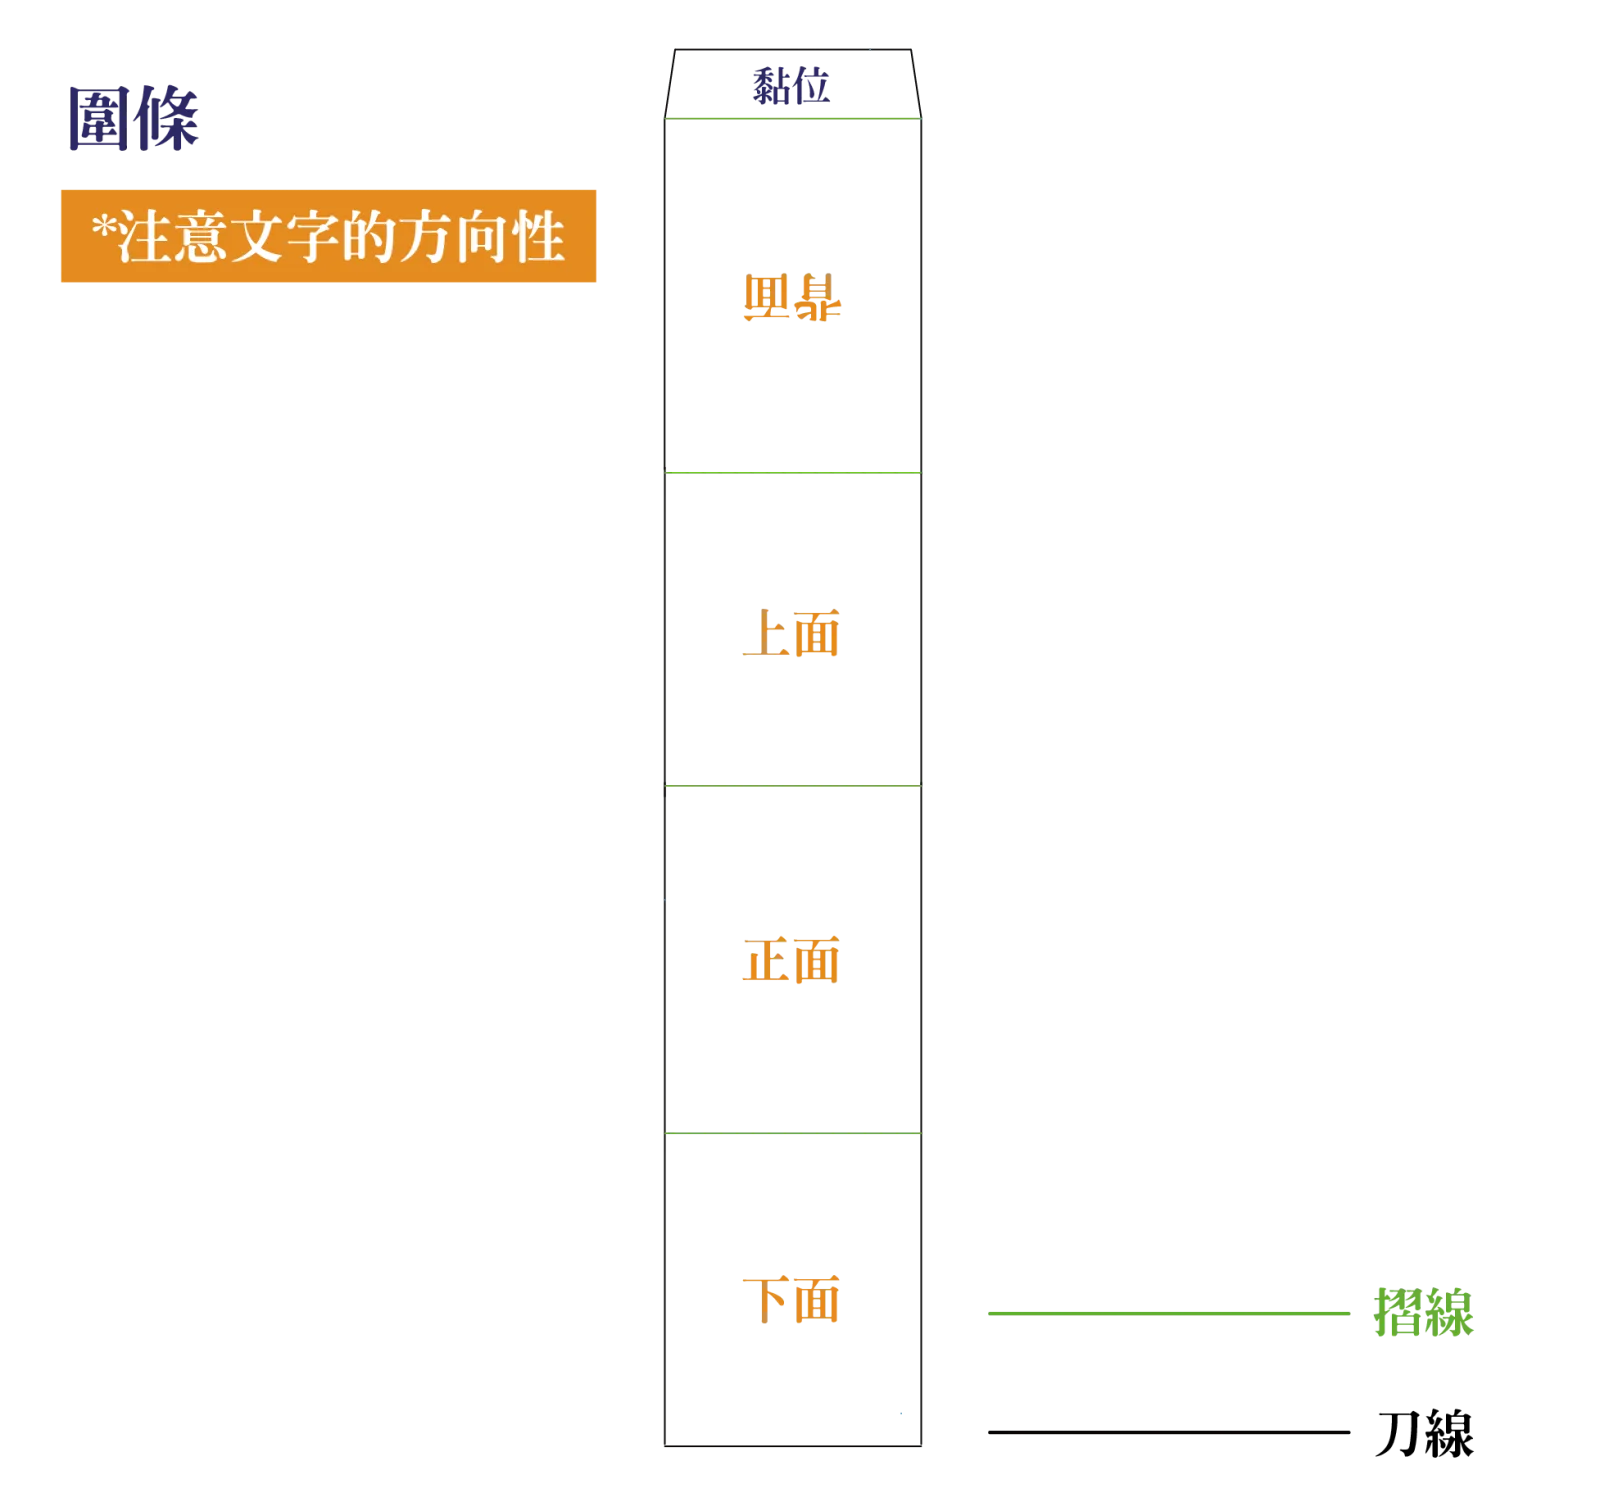
Tip:Pair a printed sleeve with a plain mailer to add a hero design without printing the whole box.
Auto-lock bottom carton and straight tuck carton
Seven panels: front, back, two sides, top and bottom flaps. The top flap can be designed in either direction; the bottom on the auto-lock version interlocks and is not printable.
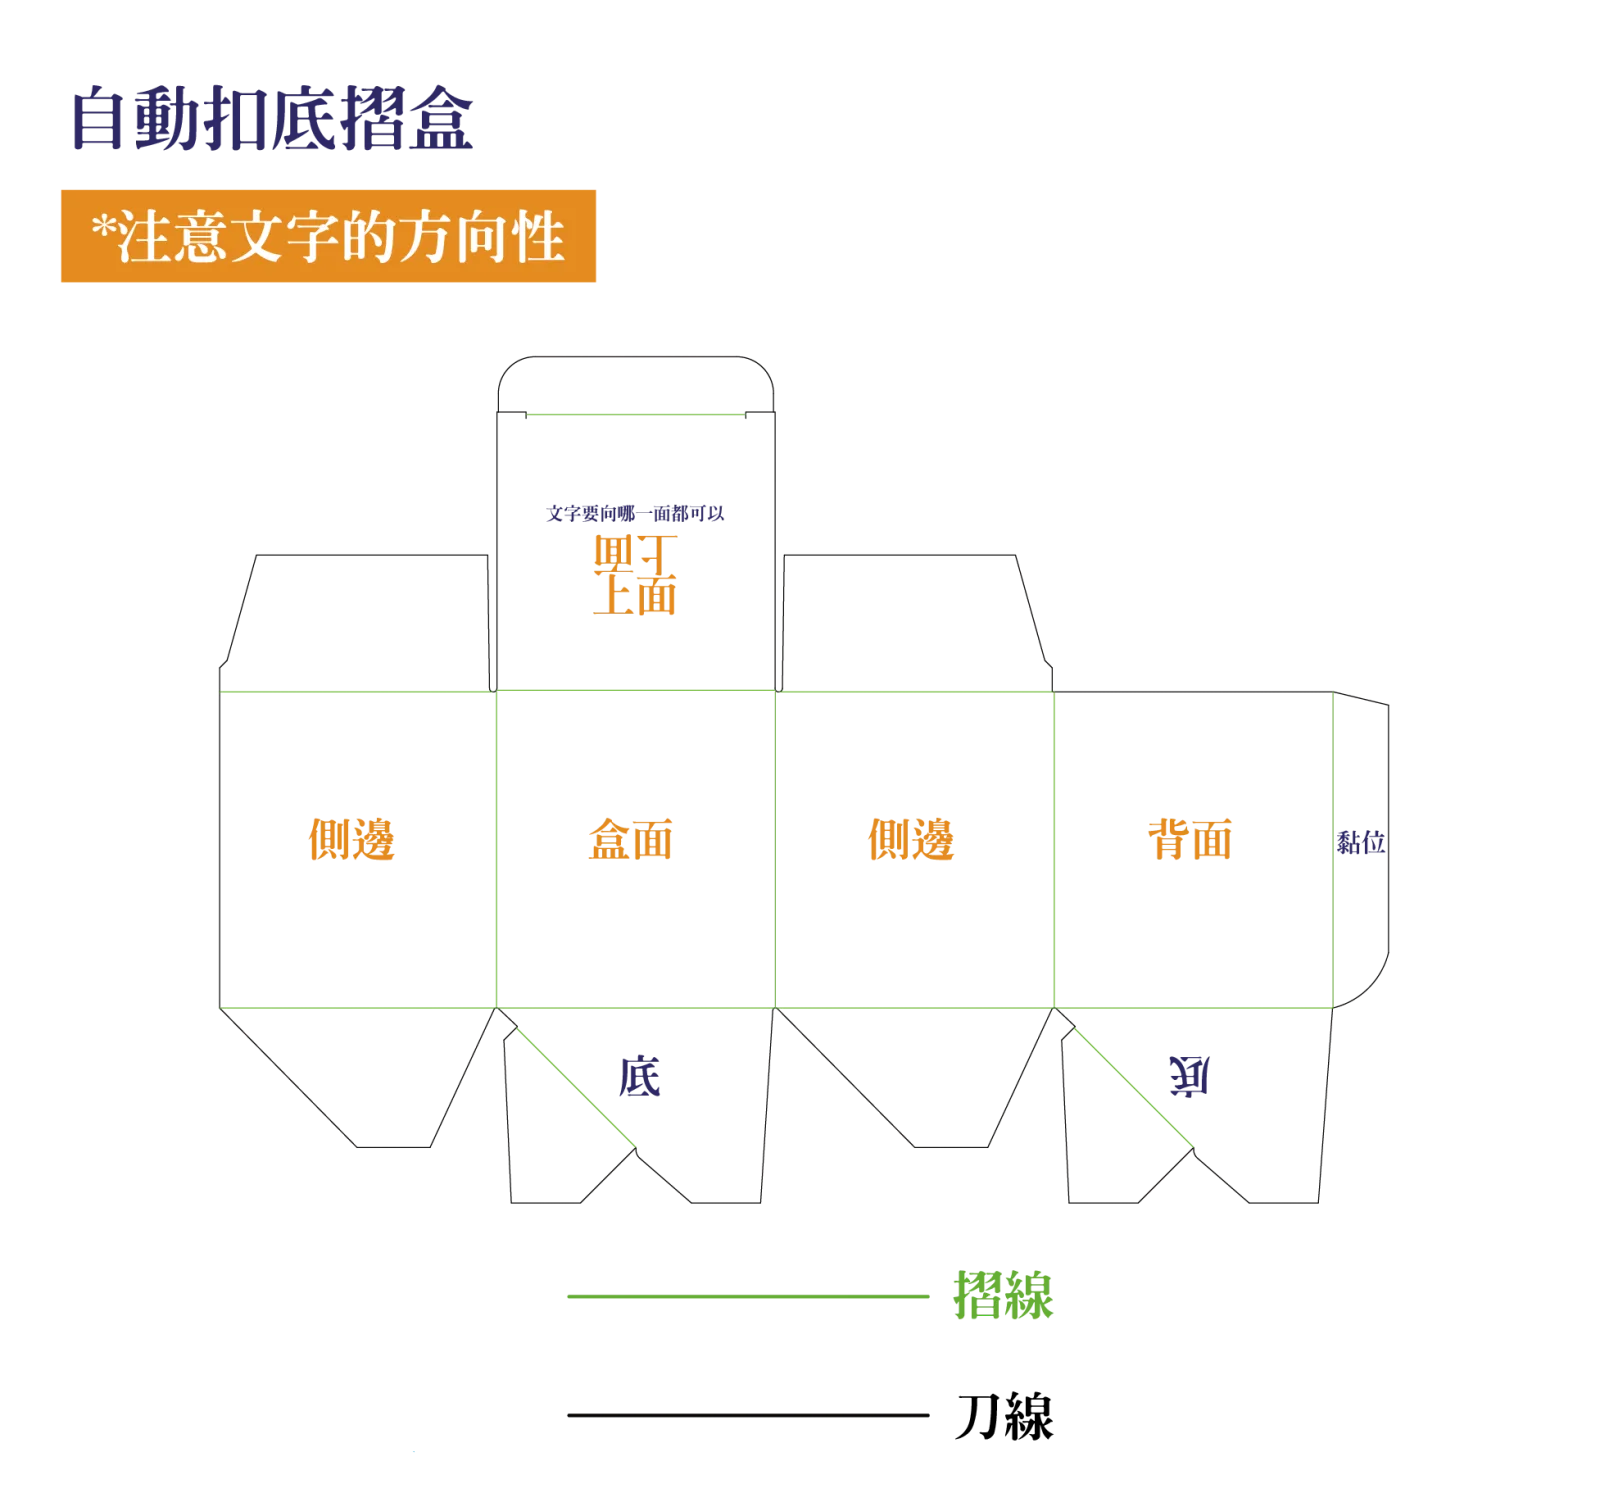
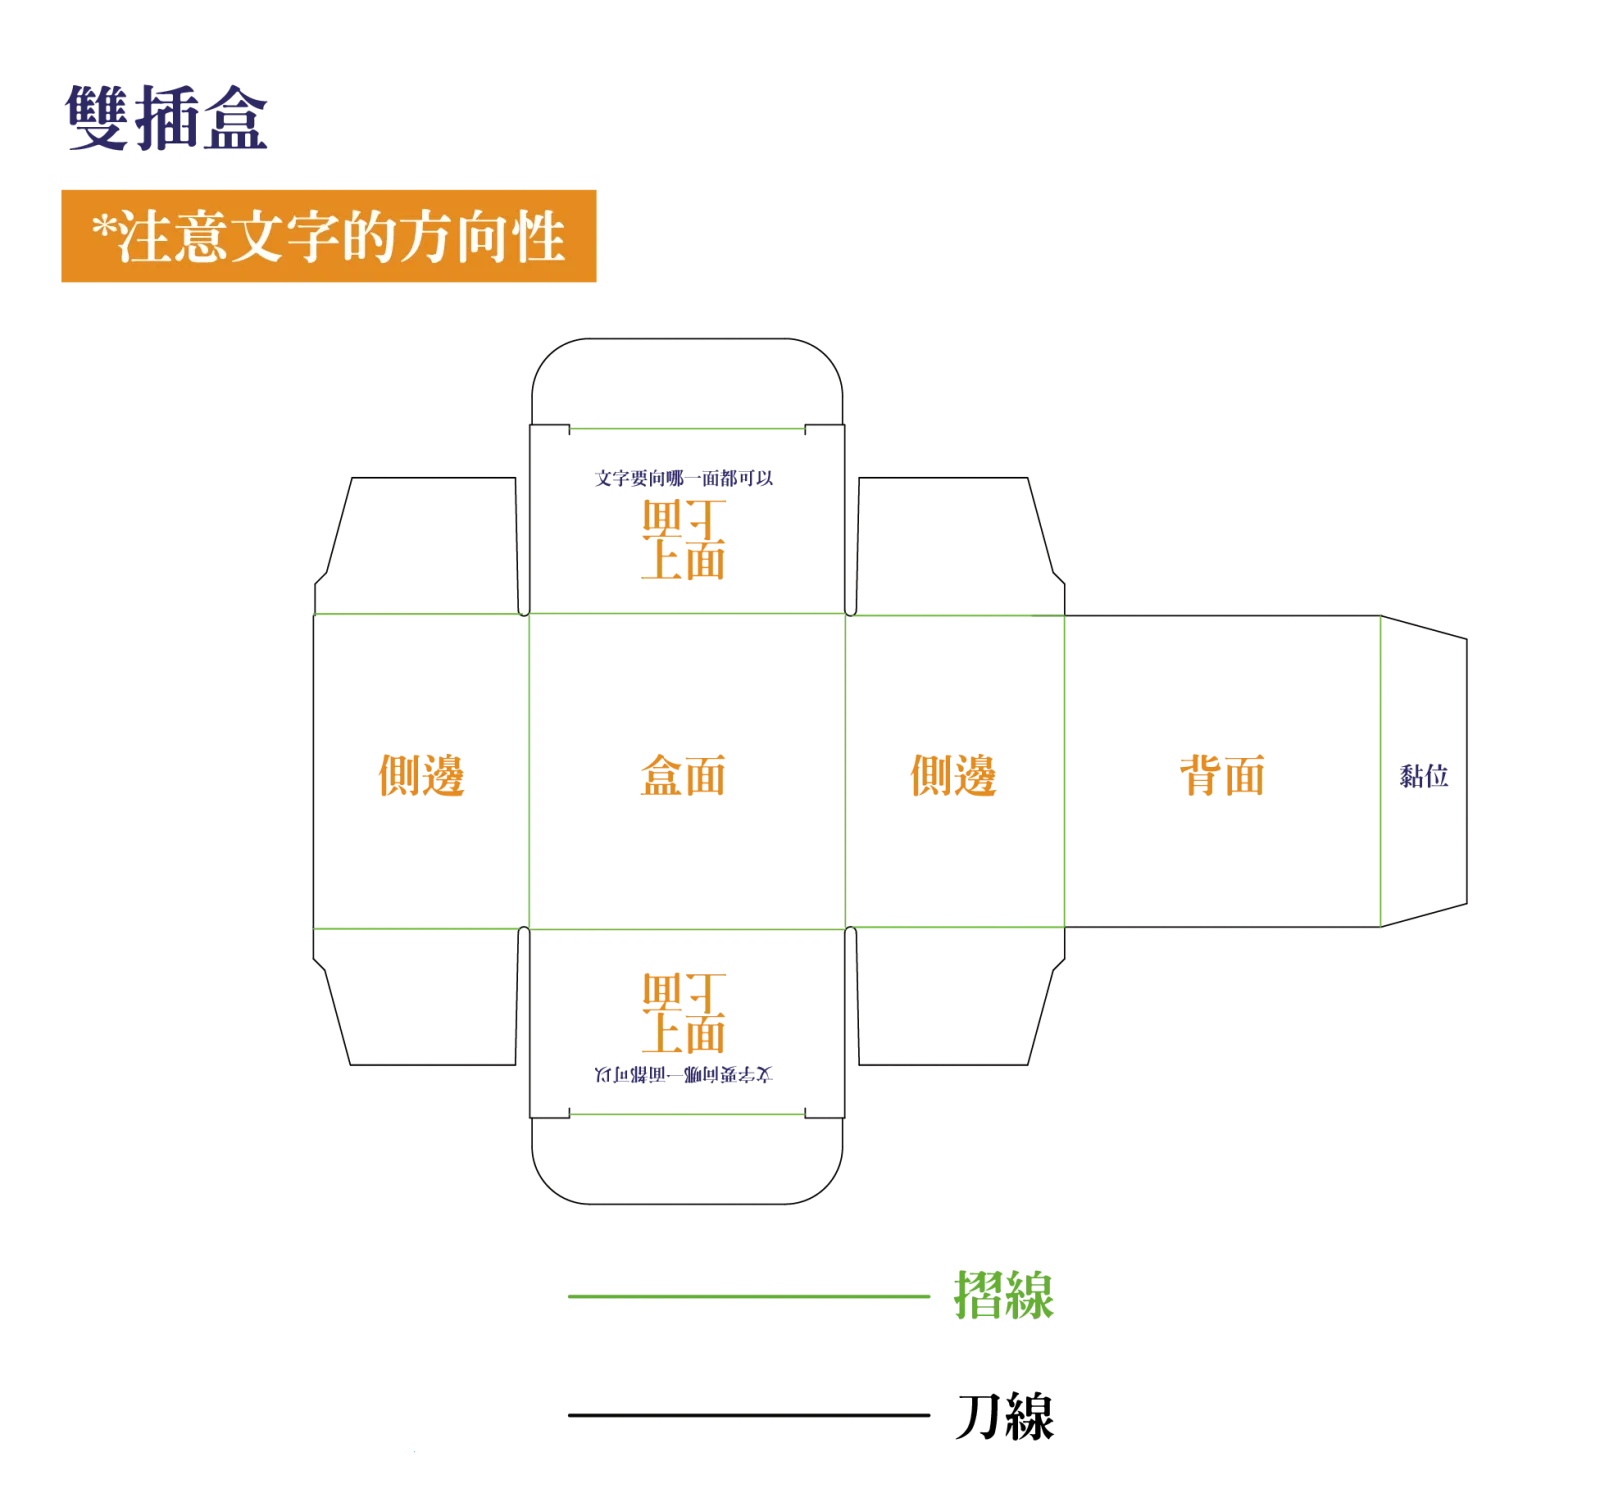
Tip:The glue flap sits on the far right of both layouts: keep it clear.
Lid-and-base folding carton (天地盒)
Two pieces, lid and base, ten panels in total: the top face and four sides of the lid, the base face and four sides of the base. Every side has a tuck-in strip that folds inside; keep artwork off those.
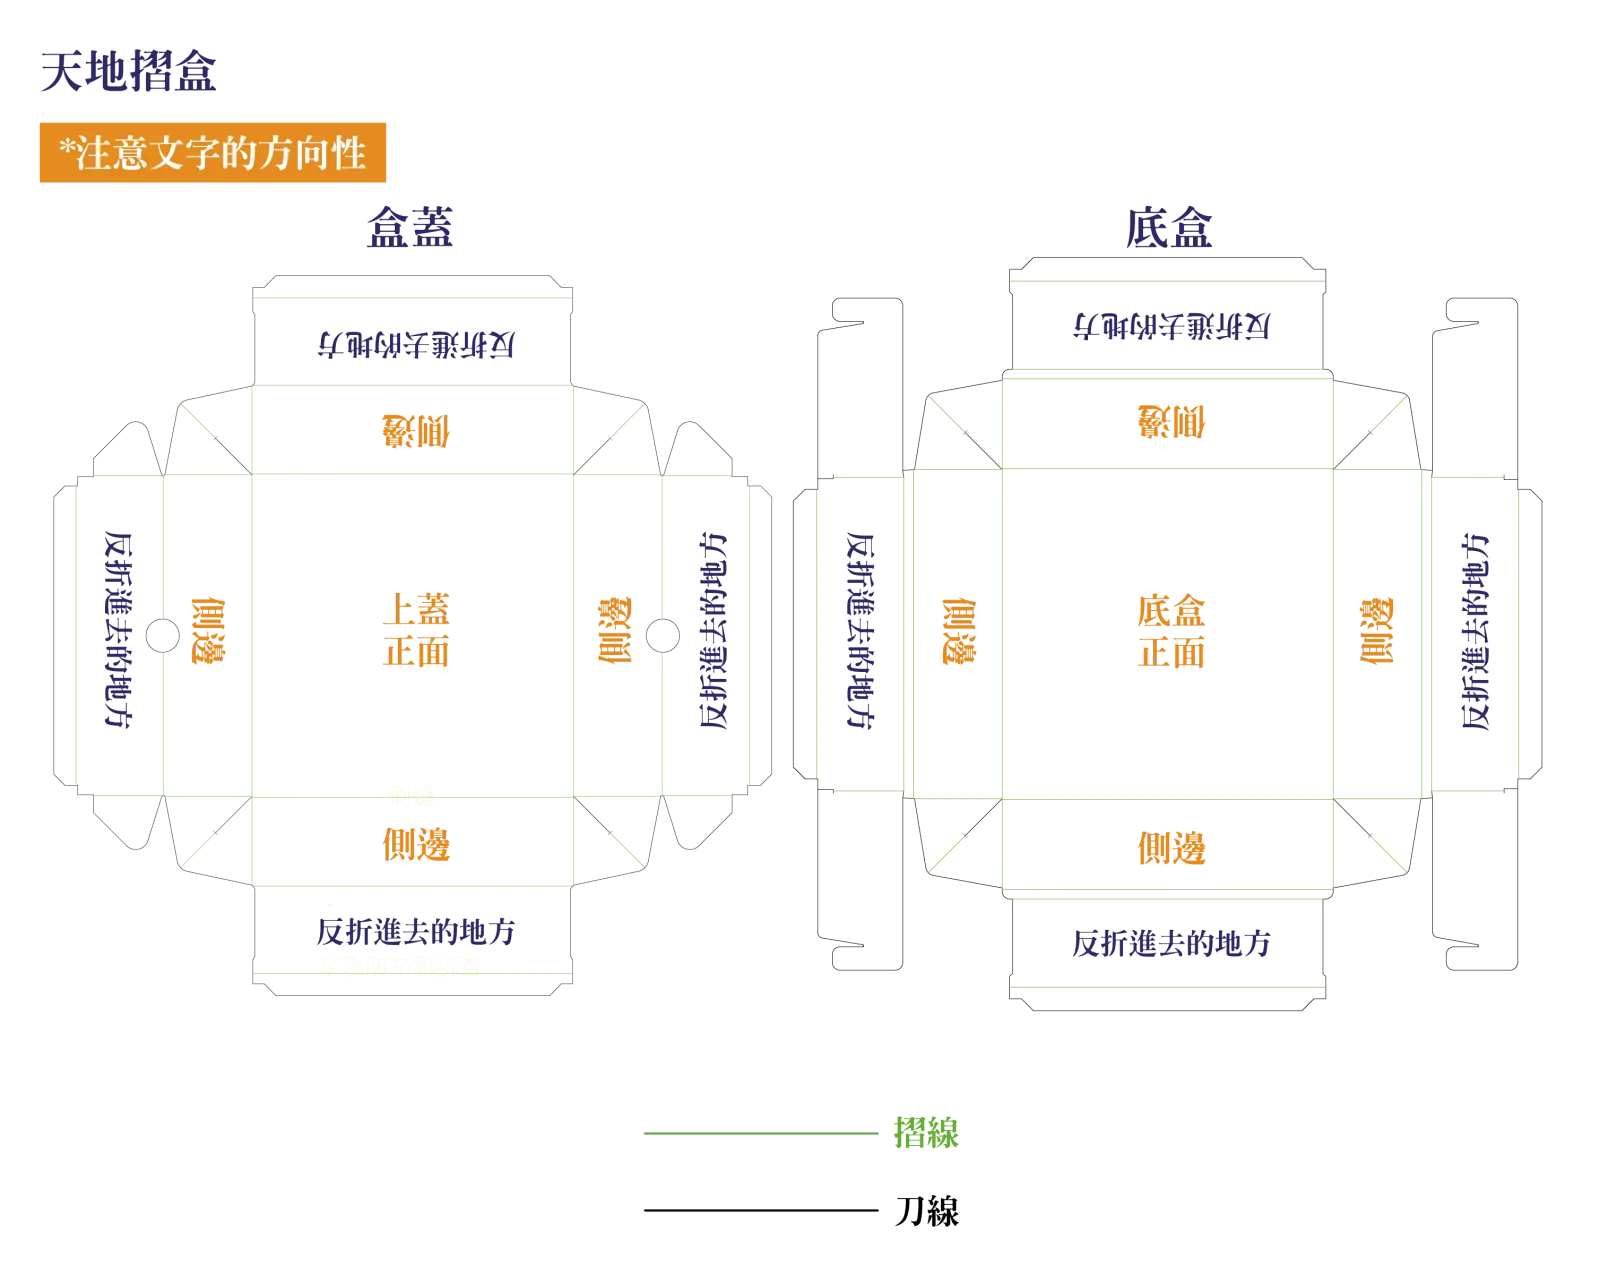
Tip:The base sides are hidden by the lid when closed: put secondary information there, not the logo.
Drawer folding carton (抽屜盒)
Nine panels across two pieces: the sleeve (front, back, top, bottom and one glue flap) and the inner tray (base, four sides and the tuck-ins). The tray has a ribbon-pull slot on one side.
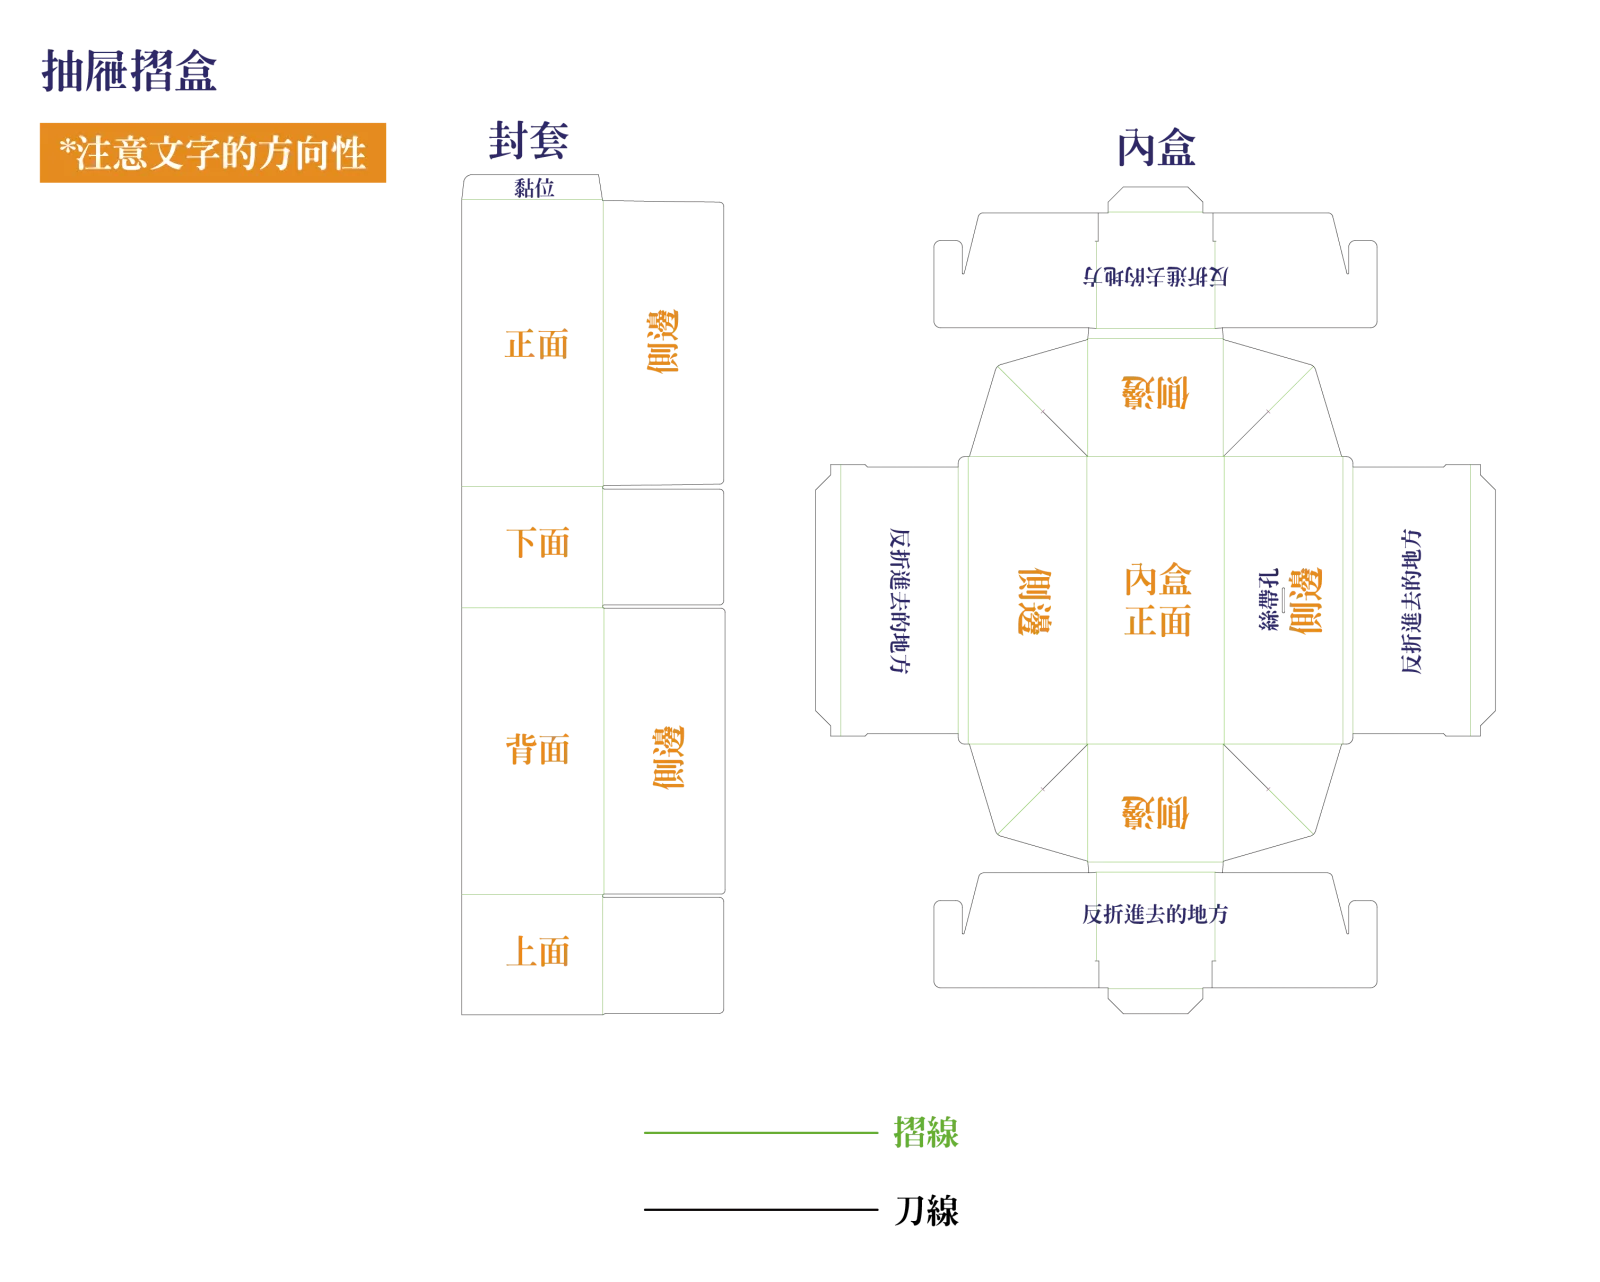
Tip:The inner tray front is what the customer sees as they pull: a good place for a message.
Matchbox folding carton (火柴盒)
Same two-piece idea as the drawer box, but the sleeve is open at both ends and the tray is shallower. The sleeve carries the design; the tray sides fold in twice and stay plain.
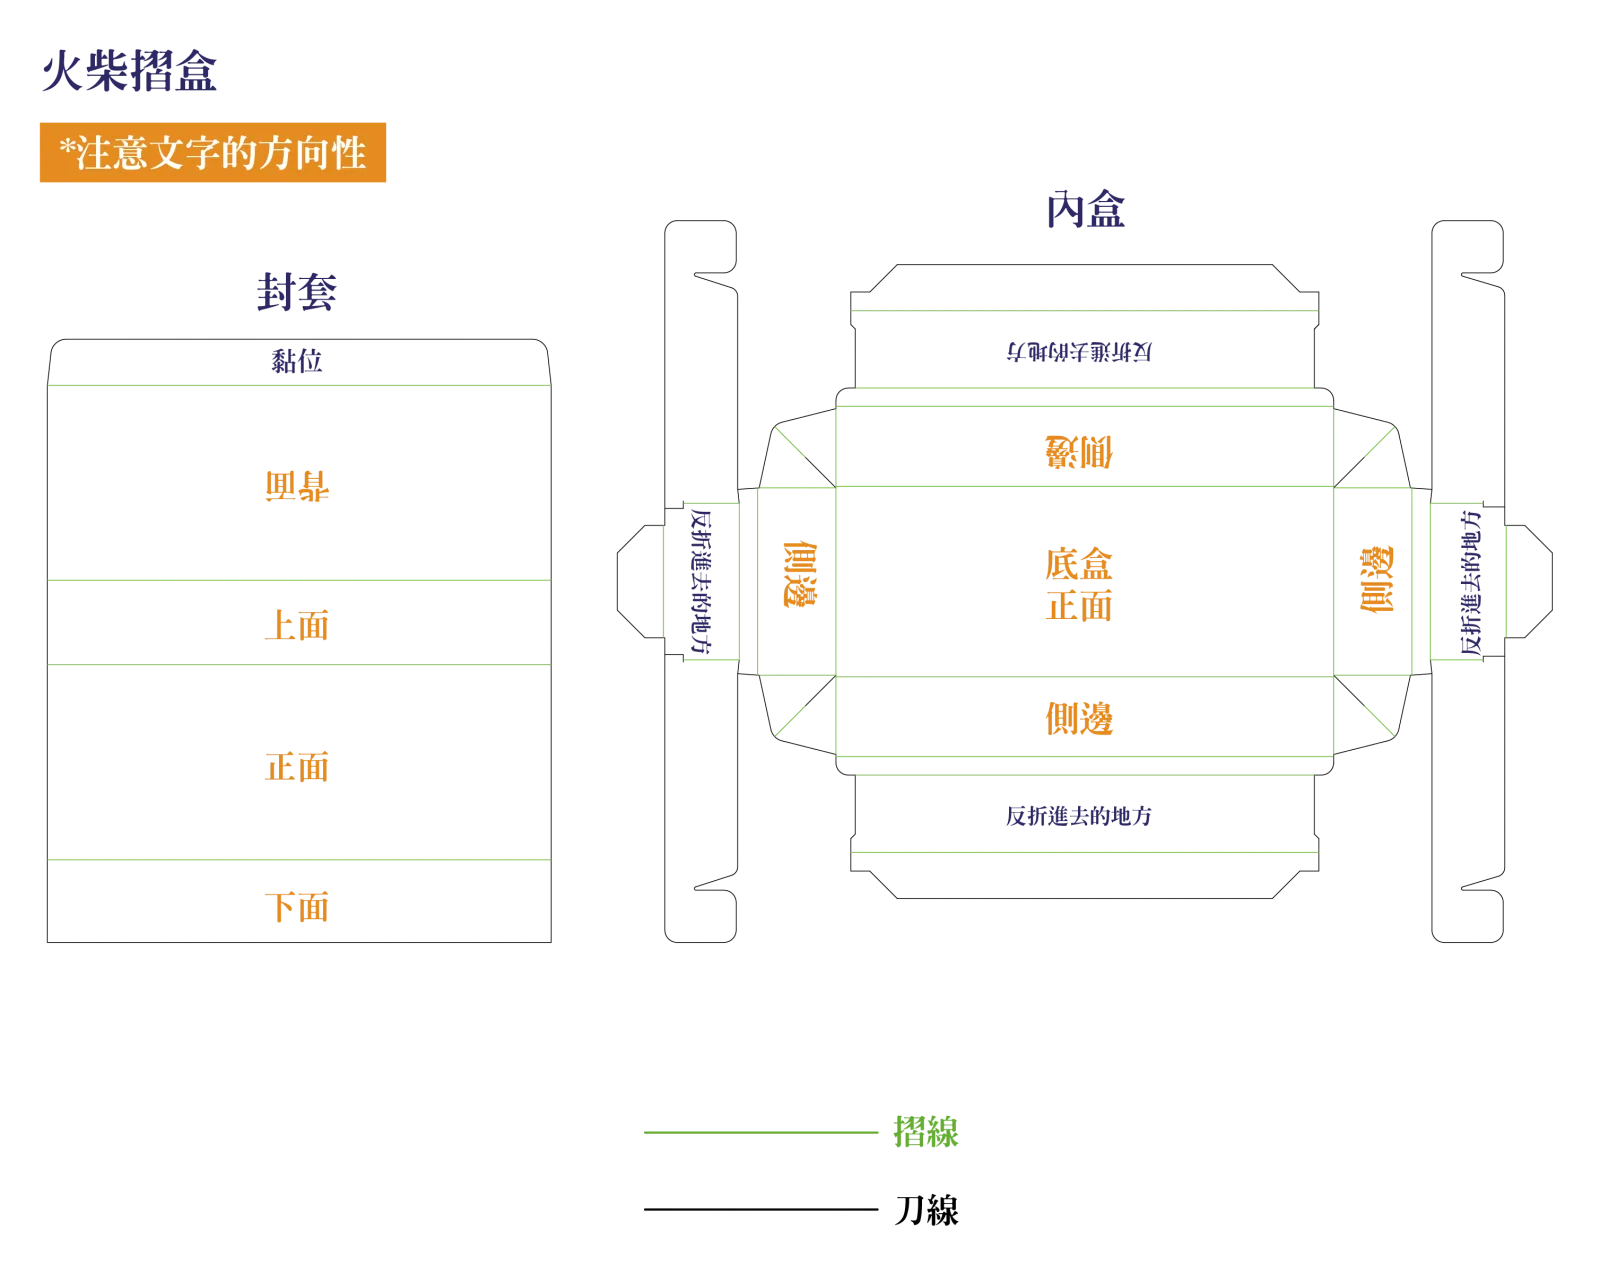
Tip:Popular for cookies and small gifts; the sleeve can be printed both sides for a surprise inside.
Kraft paper bag and handle paper bag
Five panels: front, back, two sides and the bottom, with a glue flap on the left. Handle bags add a folded-in top strip with the rope holes, so keep the top 30 mm of the front and back clear.
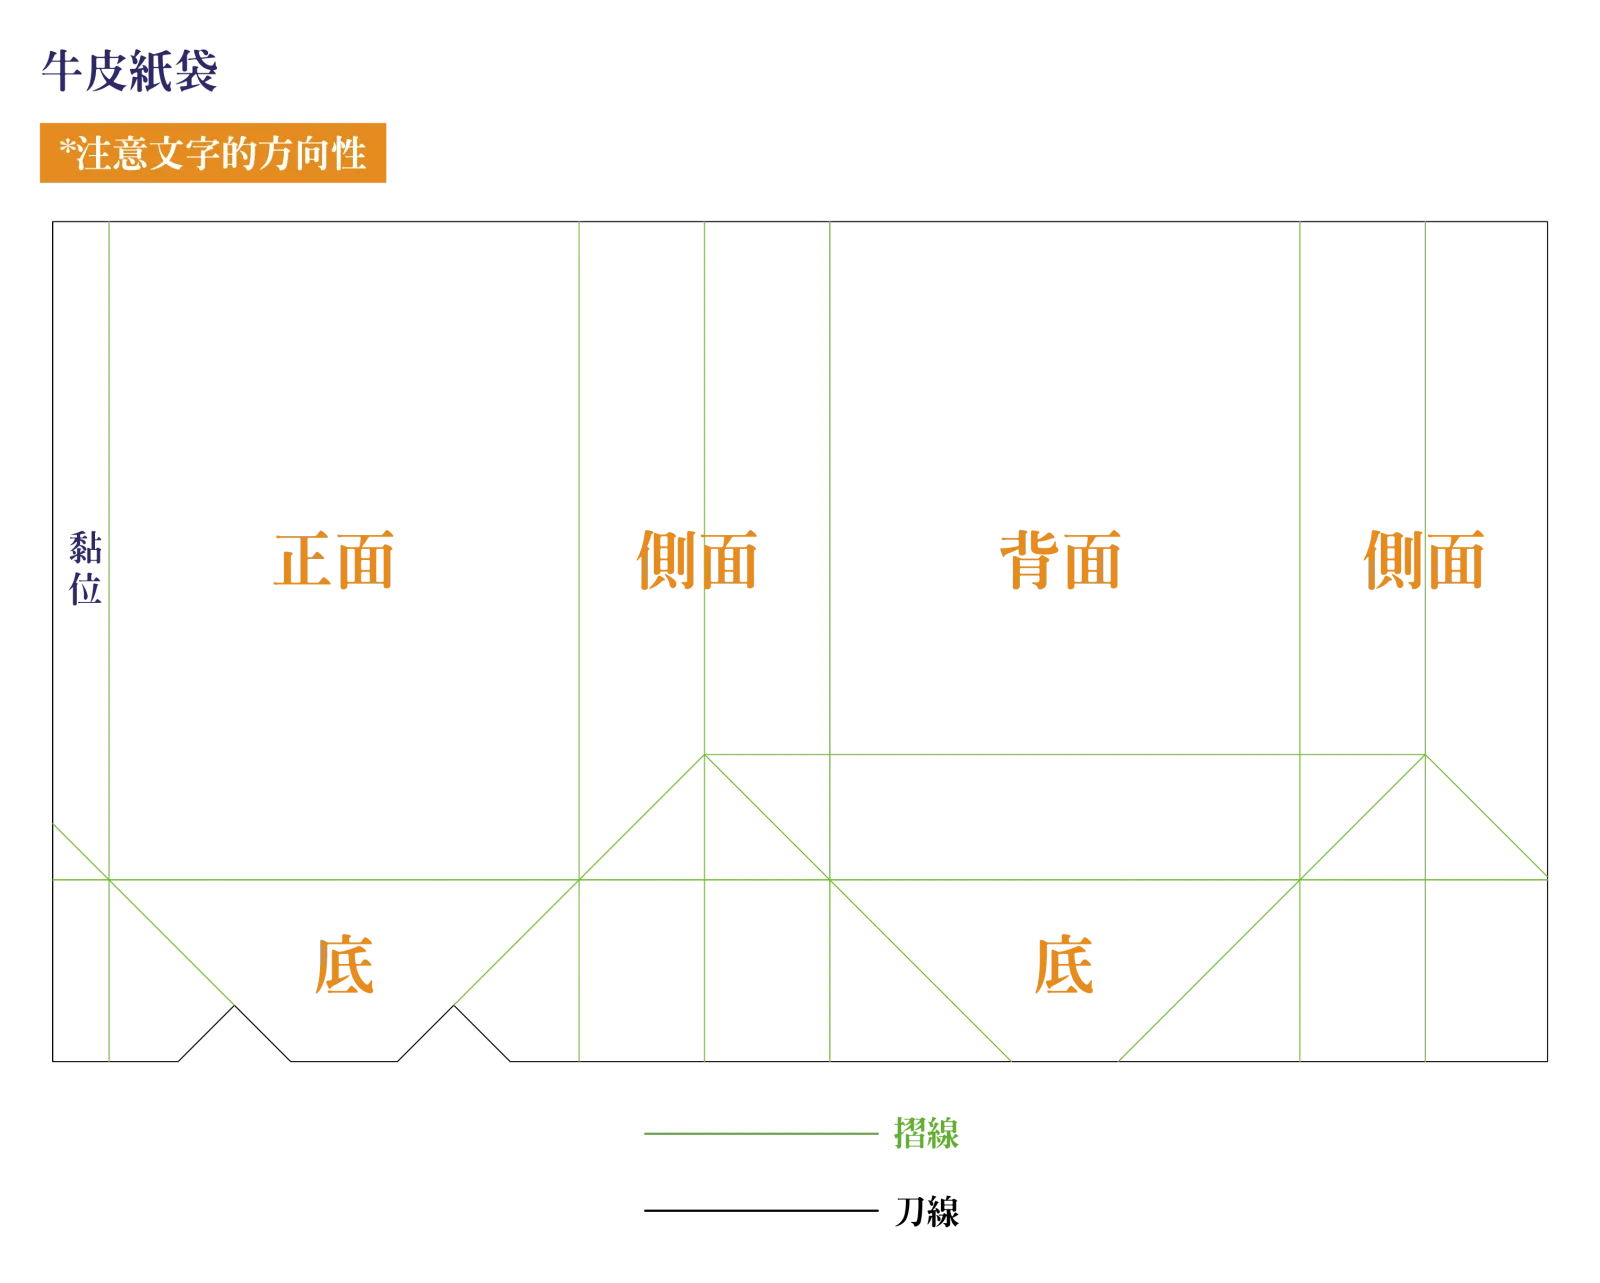
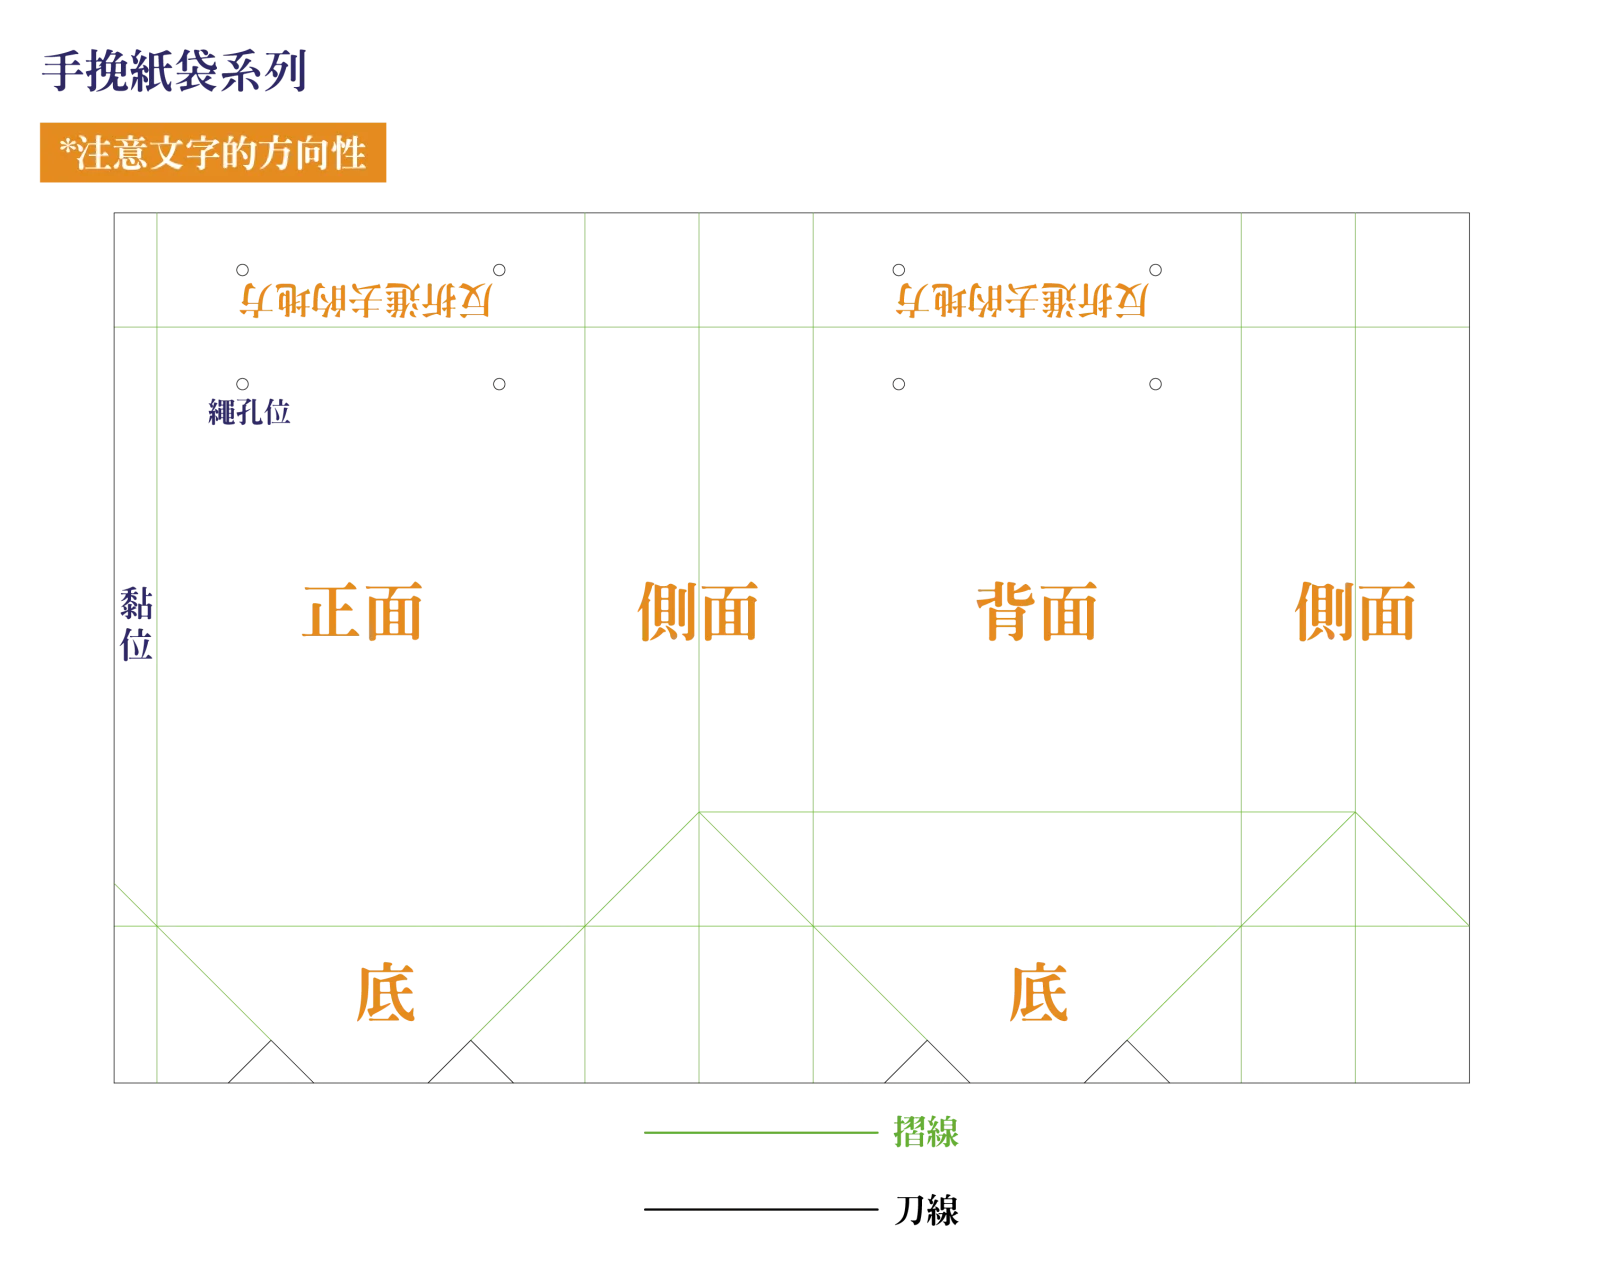
Tip:The bottom panel is folded and glued: a flat colour looks better than artwork there.
Dieline questions
What is the difference between a cut line and a fold line?+
The cut line (black) is where the blade cuts through the board and becomes the edge of the box. The fold line (green) is a crease: the board stays whole and bends there. Keep text and logos clear of fold lines, because anything crossing a crease breaks in two.
Why is some text on the dieline upside down?+
Because that panel is upside down once the box is folded. The labels are printed the way the panel will finally face, so design each panel in the direction its label reads. If the dieline says 側邊 upside down, rotate your artwork for that panel by 180 degrees.
Do I need to draw the dieline myself?+
No. Once you confirm the box style and size on the product page, BM Pack sends you the exact dieline as an AI file, free of charge. Place your artwork on it without moving the cut or fold lines, then send the file back for our pre-press check.
How much bleed should I add?+
Extend background colours and images 3 mm beyond every cut line, and keep important text at least 3 mm inside it. The dieline we send already marks the bleed edge.
Next step: get the exact dieline for your size
Pick the box style on its product page, enter your dimensions and see the price instantly. Once you confirm, we send the dieline for that exact size as an AI file, free.